Managing Repositories
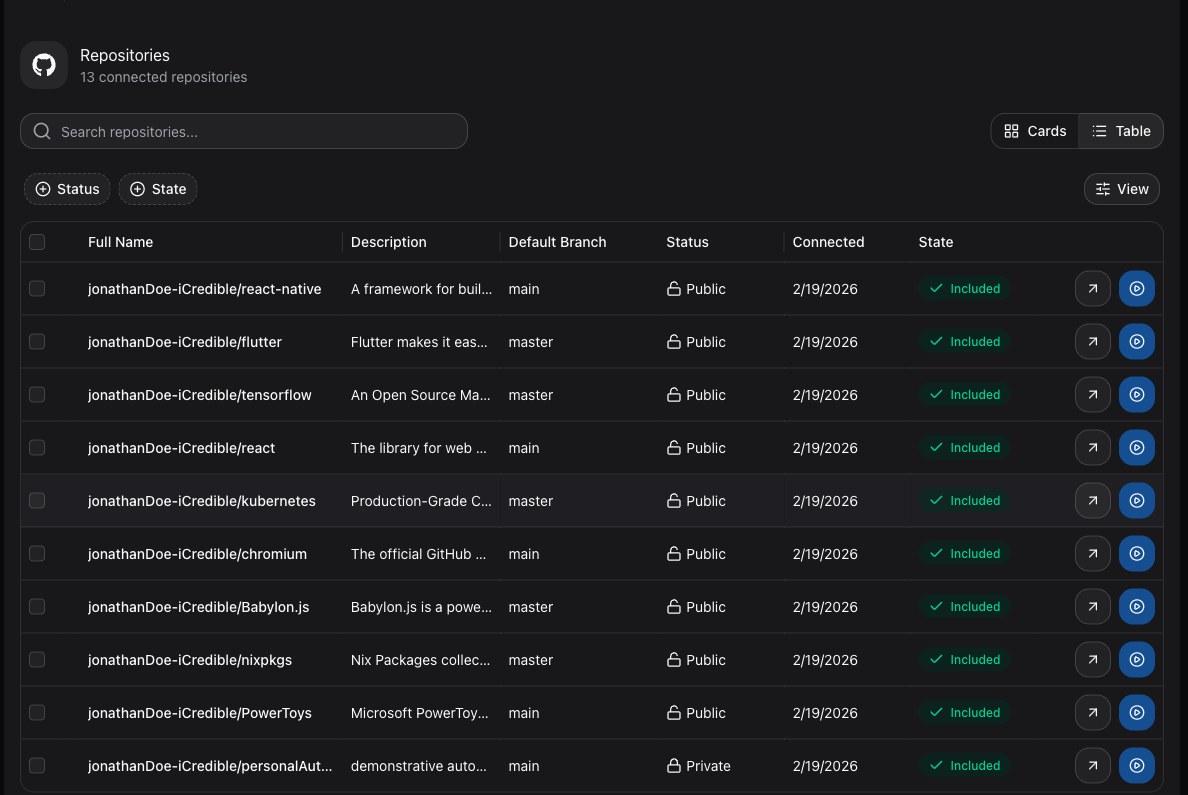
The Repositories > GitHub or Repositories > Bitbucket pages list all repositories accessible through your connected installations.
Syncing with Your Provider
GitSec keeps your repository list in sync automatically, but you can also refresh it on demand. Click the sync (refresh) button in the page header to pull the latest repositories from your Git provider. For example, right after creating a new repository on GitHub or Bitbucket.
When the sync finishes, a notification reports the result, such as 3 repositories added, 5 updated. If nothing changed, it reports No changes found.
Searching and Filtering
Use the search box above the list to find repositories by name. Results update as you type, no need to press Enter.
Next to the search box, three filter groups let you narrow the list:
| Filter | Options | Description |
|---|---|---|
| Visibility | Private, Public, Internal | Filter by the repository's visibility on the provider. |
| Status | Included, Excluded | Filter by whether the repository is included in the backup scope. |
| Archive | Archived, Not Archived | Filter by the repository's archived flag on the provider. |
Search and filter selections are reflected in the page URL, so you can bookmark a filtered view or share it with a teammate.
List and Grid Views
On desktop, a toggle above the list switches between two views:
- List: A table with detailed columns and bulk selection checkboxes.
- Grid: Cards showing each repository's name, description, visibility, and actions.
Your choice is remembered for 7 days. On mobile devices, the list view is always used.
Repository List
In the list view, the table shows the following columns:
| Column | Description |
|---|---|
| Full Name | The owner and repository name (e.g., org/repo-name). Click it to open the repository detail page, and hover over any warning icon next to it to see why a repository is inaccessible. |
| Description | The repository description from GitHub/Bitbucket. |
| Default Branch | The primary branch (e.g., main, master). |
| Visibility | Whether the repository is Private, Public, or Internal. |
| Connected | The date the repository was connected to GitSec. |
| Archived Status | Whether the repository is Archived or Not Archived. |
| State | A toggle showing whether the repository is Included in or Excluded from backups. |
At the end of each row (and on each card in grid view) you will find two actions:
- Open on provider: The arrow icon opens the repository on GitHub/Bitbucket in a new tab.
- Backup now: Starts an on-demand backup of the repository (see below).
Including and Excluding Repositories
When repositories are first synced from GitHub/Bitbucket, they are Excluded by default. You need to manually include the repositories you want to protect:
- Excluded: The default state. The repository is not eligible for automated backups.
- Included: The repository is eligible for scheduled, on-demand, and push-event backups.
To change a single repository's state, use the toggle in the State column. Archived repositories cannot be included.
:::info Included repositories count toward your plan Each included repository consumes one repository slot from your plan's quota. If including a repository would exceed the remaining quota, the change is rejected. Exclude other repositories or upgrade your plan first. Excluding a repository frees its slot.
Excluding, on the other hand, is never blocked: even when you are over your plan's limit (for example, after a downgrade), you can always exclude repositories to get back under the quota. :::
:::note Excluding disables the repository's schedulers Excluding a repository also disables its backup schedulers, and a scheduler cannot be enabled while its repository is excluded. When you include the repository again, its schedulers stay disabled, re-enable them manually from the Schedulers page or the repository's Scheduler tab. Backups never resume on their own after a repository is re-included. :::
Bulk Include and Exclude
To change many repositories at once, use bulk selection, available in the List (table) view only:
- Tick the checkboxes of the repositories you want to change. The checkbox in the header row selects every repository on the current page. Archived repositories cannot be selected.
- A toolbar appears showing the number of selected repositories.
- Click Include selected to include them in the backup scope immediately, or Exclude selected to remove them.
- Excluding asks for confirmation first, because the selected repositories will no longer receive scheduled or on-demand backups.
Bulk inclusion is subject to the same quota check as single inclusion: if the selection would exceed your plan's remaining repository quota, the operation is rejected.
Backing Up a Repository On Demand
Click Backup now on any row or card to start a backup right away, without waiting for a scheduler. A dialog opens where you select which scopes to include:
| Scope | Availability |
|---|---|
| Code & Commits | Available |
| Pull Requests | Available |
| Issues | Available (not shown for Bitbucket repositories) |
| Wiki Pages | Coming Soon |
| Projects | Coming Soon |
| Releases | Coming Soon |
Click Start Backup to queue the backup. You can follow its progress on the repository's Activity tab.
Backup now is disabled with a tooltip explaining why. For repositories that are archived, excluded from the backup scope, or no longer accessible (for example, when the repository was deleted on the provider or GitSec's access was revoked).
See Creating Backups for more on backup types and scopes.
Pagination
If you have many repositories, the list is paginated. Use the pagination controls at the bottom to navigate between pages and change the page size.
Opening a Repository
Click a repository's name to open the Repository Detail page, where you can view backups, configure schedulers, manage push events, and more.